A Crispy Twist on the Classic Kachori
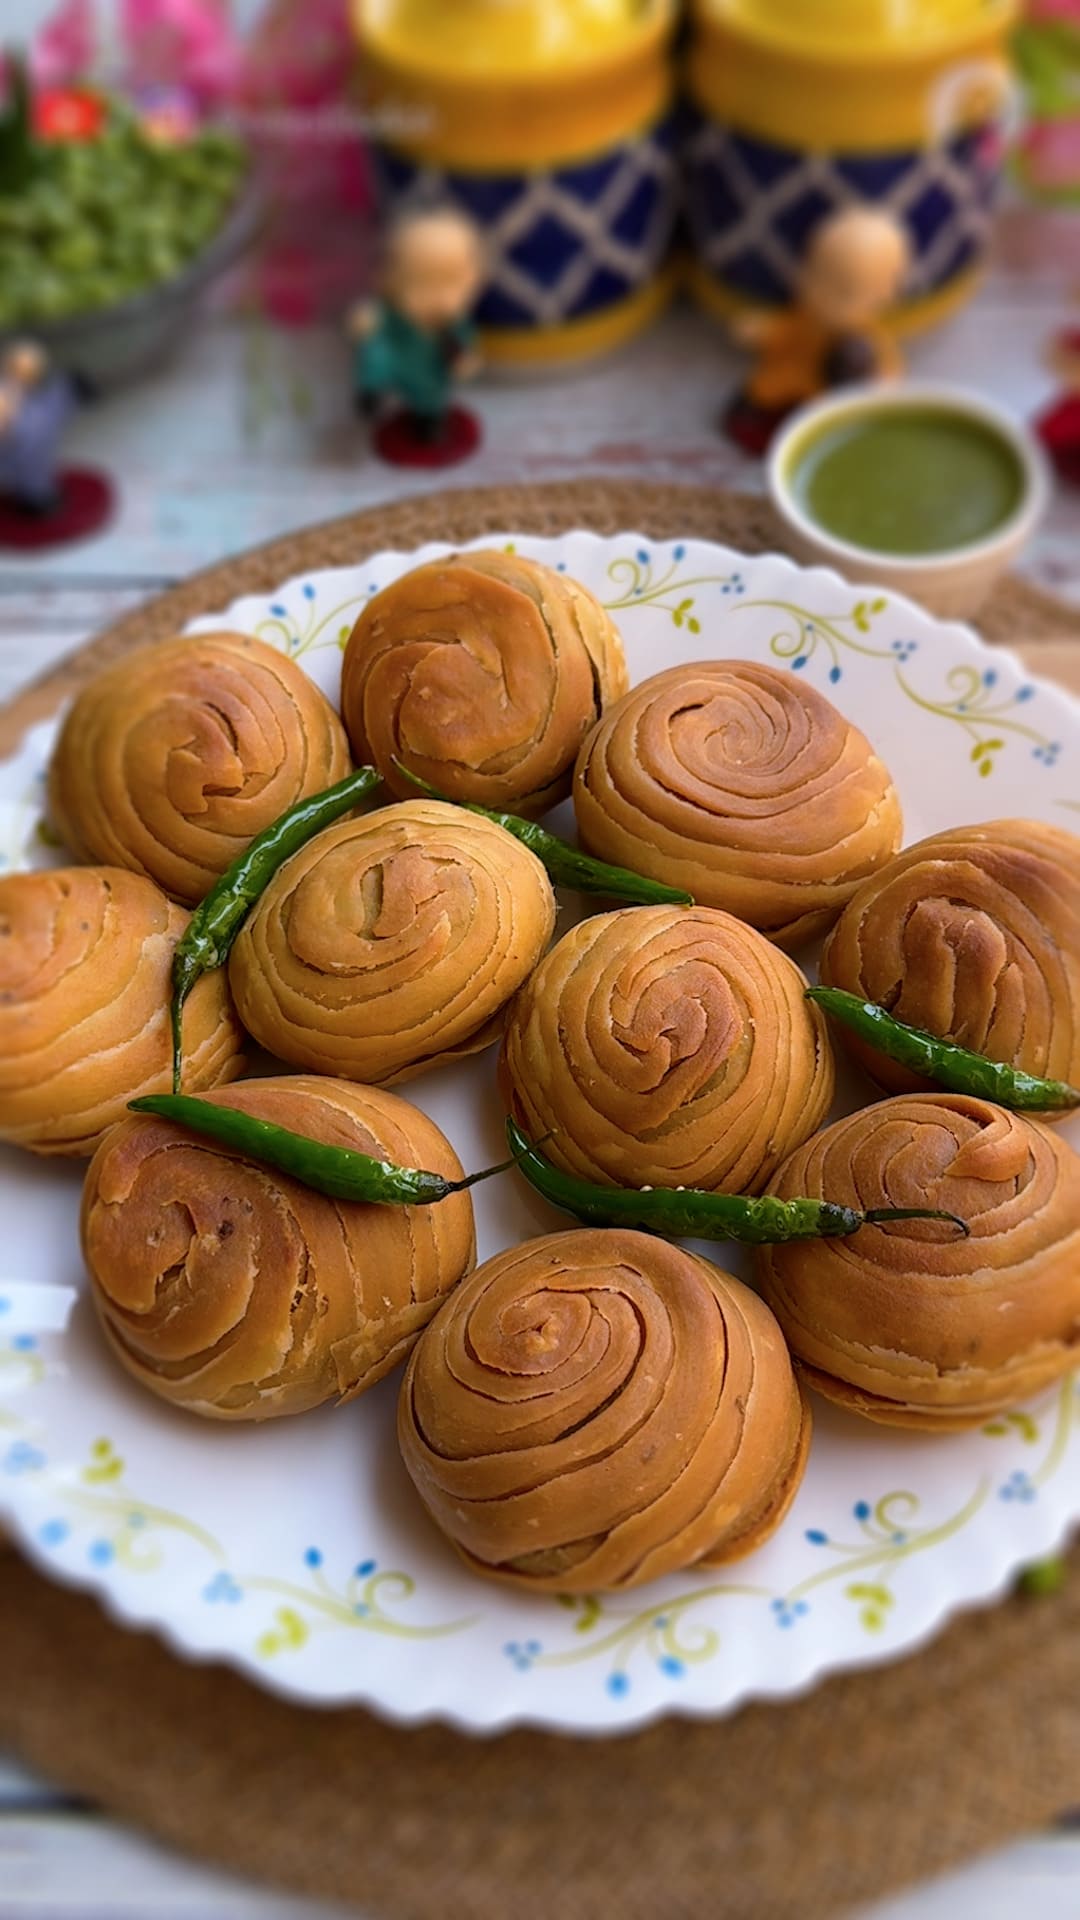
Winter in India is incomplete without fresh Green Peas (Matar), and the best way to enjoy them is stuffing them into a deep-fried pastry. But this isn’t your average Kachori. This is Layers wali Matar Kachori (also known as Warqi Kachori).
At Neera Food Lab, we love adding textures to food. By using a simple folding technique with ghee and flour, we create multiple flaky layers in the outer crust. When you bite into it, the crust shatters, revealing a spicy, aromatic green pea filling. It’s crispy, flaky, and absolutely addictive—perfect for a weekend breakfast or evening chai.
Why You Will Love This “Layered” Version
- The Crunch Factor: Regular kachoris are crunchy, but this layered version is flaky (Khasta). The layers trap air and fry up to create a texture similar to a puff pastry.
- Aromatic Filling: We don’t just use powder spices. We make a fresh “Dardara” (coarse) paste of fennel, cumin, and ginger-garlic, which explodes with flavor.
- No Soggy Mess: We use Besan (Gram Flour) in the filling. This secret ingredient absorbs the moisture from the peas, ensuring your kachori stays crisp for hours.
Secrets to Perfect Layers & Filling
- The Coarse Grind: Never grind the peas into a fine paste. Pulse them in the mixer so they remain coarse. You want to feel the texture of the peas in every bite.
- Low Heat Frying: This is the golden rule for any Khasta Kachori. You must fry them on low to medium heat. If the oil is too hot, the outer layer will brown quickly, but the inner layers will remain raw and doughy. Patience is key!
- The Layering Step: When applying ghee and sprinkling dry flour (Maida) before folding, be generous. This mixture (often called Sata) prevents the dough layers from sticking together, creating that beautiful flaky effect when fried.
Layers wali Khasta Matar Kachori
Course: Snack / BreakfastCuisine: North Indian6-8
Kachoris30
minutes30
minutes280
kcalA unique winter snack featuring a flaky, multi-layered crust stuffed with a spicy fresh green pea filling. Crispy on the outside, aromatic on the inside—perfect with chutney and chai.
Ingredients
- For The Fresh Masala Paste:
4–5 Garlic cloves
½ inch Ginger
3–4 Green Chillies
½ tbsp Cumin Seeds (Jeera)
½ tbsp Fennel Seeds (Saunf)
5–6 Black Peppercorns (Kali Mirch)
- For The Filling:
1 cup Green Peas (Fresh or Frozen)
1 tbsp Besan (Gram Flour)
½ tbsp Hing (Asafoetida)
½ tbsp Turmeric Powder (Haldi)
½ tbsp Sabji Masala (or Garam Masala)
½ tbsp Red Chilli Powder
½ tbsp Black Salt (Kala Namak)
½ tbsp Amchur Powder (Dry Mango Powder)
Salt (to taste)
Oil (for cooking filling)
- For The Dough & Layers:
1 cup Maida (All Purpose Flour)
1 tbsp Ajwain (Carom Seeds)
2 tbsp Ghee (for Moyan/shortening)
Salt (to taste)
Water (as needed to knead)
Extra Ghee & Dry Maida (for creating layers)
Oil (for deep frying)
Instructions
- Prepare the Pastes: In a small blender jar, add garlic, ginger, green chillies, cumin seeds, fennel seeds, and peppercorns. Grind to a coarse paste. Separately, grind the green peas into a coarse paste (do not make it watery). Keep aside.
- Cook the Filling: Heat oil in a pan. Add the prepared masala paste and sauté for 30–40 seconds until aromatic. Add Besan and Hing. Roast for 1 minute (the besan helps bind the peas). Add turmeric, sabji masala, and red chilli powder. Mix well. Add the coarse green pea paste. Mix properly. Season with regular salt, black salt, and amchur powder. Cook on medium flame for 4–5 minutes until the moisture evaporates and the mixture creates a lump. Let it cool completely.
- Make the Dough: In a bowl, mix maida, salt, ajwain, and ghee. Rub the ghee into the flour with your fingertips until it resembles breadcrumbs. Add water gradually and knead into a semi-stiff dough. Cover and rest for 15 minutes.
- Create Layers & Shape: Divide dough into equal portions. Roll one portion into a small roti. The Layer Step: Apply a thin layer of ghee on the roti and sprinkle a little dry maida. Fold the roti (like a square or roll it) to create layers. Roll it out gently again. Place a spoonful of the cooled filling in the center. Bring the edges together and seal tightly. Press gently to flatten it into a kachori shape.
- Fry: Heat oil in a kadhai. The oil should be medium-hot (not smoking). Slide the kachoris in. Fry on low-to-medium flame. Splash oil over them occasionally. Fry until they puff up and turn golden brown and crisp. (Typical frying time: 6–8 minutes per batch.)
- Serve: Drain on paper towels and serve hot with chutneys.
Recipe Video
Notes
- Serving: Serve these hot with Green Chutney and Sweet Tamarind (Imli) Chutney. A hot cup of Ginger Tea is mandatory!
- Storage: These kachoris have a great shelf life.
Recipe Tips & TroubleshootinQ: My kachoris aren’t puffing up. What went wrong?
A: The oil temperature is too low, or you’re using high heat too early. Maintain low-to-medium heat consistently. The dough should puff gradually, not all at once.
Q: The outer layer is brown, but inside is still doughy.
A: Your oil is too hot. Reduce the flame immediately. Khasta kachori requires patience—fry slowly to allow the inner layers to cook through.
Q: The layers aren’t visible when I cut it open.
A: You may not have applied enough ghee and dry maida between folds, or you didn’t fold enough times. Be generous with the “Sata” (ghee-flour mixture).
Q: Can I make these ahead?
A: Yes! Prepare the dough and filling the night before. Assemble and fry on the day of serving for best crispness.


Leave a Reply