The Queen of Indian Desserts
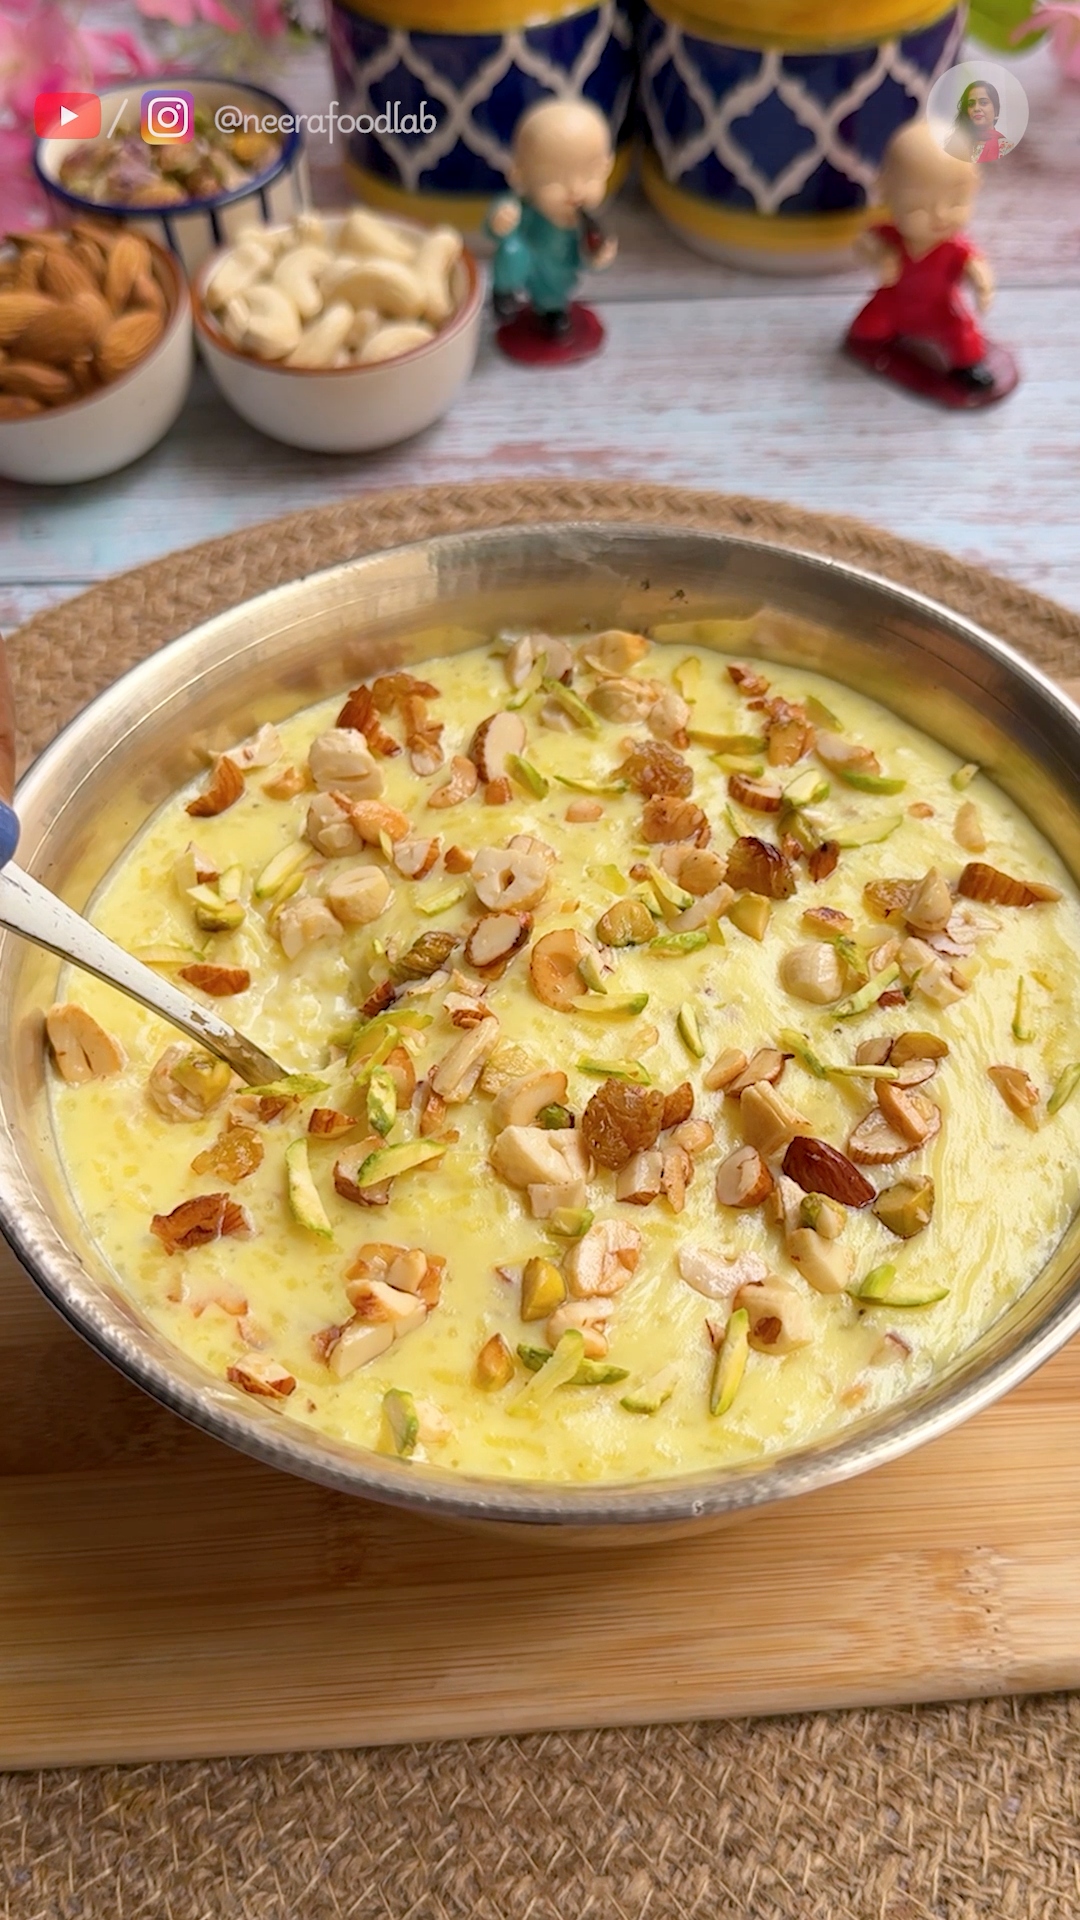
If there is one dessert that defines celebration in India, it is Rice Kheer. From weddings to festivals, or simply as a comforting end to a Sunday meal, a bowl of thick, creamy Kheer is pure emotion.
At Neera Food Lab, we cherish traditions. This particular recipe is special because it is perfect for beginners—whether you are a student cooking away from home or a new bride making her “Pheli Rasoi” (first kitchen ritual). We use Full-Fat Milk for creaminess and a special step of roasting the rice in Ghee, which adds a nutty aroma you won’t find in standard recipes.
Why You Will Love This Recipe
- The “Ghee-Roast” Flavor: Unlike recipes that add raw rice directly to milk, we lightly roast the soaked rice in ghee. This prevents the rice from becoming sticky and adds a subtle, rich aroma.
- No Condensed Milk Needed: This is the authentic method. We slow-cook the milk to reduce it naturally, giving it a caramelized, creamy texture without using artificial thickeners or milkmaid.
- Perfect Texture: By cooking on a low flame, the rice grains become incredibly soft and blend seamlessly with the thickened milk (Rabdi texture).
Secrets to the Perfect Kheer
- Full-Fat Milk is Mandatory: Do not use toned or skimmed milk. The richness of Kheer comes from the fat content in the milk.
- Soak the Rice: Soaking the rice for 20 minutes ensures it cooks faster and blooms perfectly.
- Sugar at the End: This is the most important tip. Never add sugar while the rice is cooking. Sugar hinders the cooking process of rice grains. Always add it once the rice is completely soft and the milk has thickened.
- Stir, Stir, Stir: Milk tends to stick to the bottom of the pan. Keep scraping the sides (the Malai) and mixing it back into the Kheer for that rich texture.
Variations You Can Try
Jaggery Kheer:
Replace sugar with 1/2 cup grated jaggery. Always add jaggery after switching off the flame and letting the kheer cool slightly (jaggery can curdle hot milk). Stir well until fully dissolved. This version has a deeper, earthier sweetness and is perfect for winter.
Condensed Milk Shortcut:
For a faster kheer, use 1/2 cup sweetened condensed milk + 1 litre full-fat milk. This reduces cooking time to just 10–12 minutes. The kheer will be sweeter and richer, and you can skip adding sugar. Great for busy weeknights.
Dry Fruit-Rich Kheer:
Double the quantity of nuts and add additional dry fruits like raisins, dates, figs, or chironji. Soak some in warm water before adding for extra texture. This creates a more indulgent, festive version perfect for special occasions.
Vermicelli + Rice Kheer (Mixed Texture):
Add 2–3 tablespoons of roasted sevaiya (vermicelli) along with the rice. This creates a mixed texture—some soft rice grains and some thin noodle strands. Reduce rice to 3 tablespoons if using sevaiya. Adjust cooking time as vermicelli cooks faster than rice.
Reduced-Milk Kheer (Lighter Version):
Use 800ml milk instead of 1 litre for a lighter, less heavy version. This works well in summer or for those who find traditional kheer too rich. The consistency will be slightly thinner but still creamy.
Cardamom + Rose Version:
Add 2–3 tablespoons of rose water after cooking. Reduce cardamom to 1/4 tbsp to avoid overpowering. Garnish with dried rose petals and silver leaf for an elegant, special occasion kheer.
Badam (Almond) Kheer:
Add 3–4 tablespoons of almond paste or finely ground almonds to the milk while cooking. This creates a creamier texture and subtle almond flavour. You can reduce the quantity of other nuts accordingly.
Traditional Rice Kheer (Creamy Indian Rice Pudding)
Course: DessertCuisine: Indian4
servings20
minutes30
minutes280
kcalA rich and creamy Indian rice pudding made by slow-cooking rice in full-fat milk, flavored with saffron, cardamom, and roasted dry fruits. Perfect for festivals and special occasions.
Ingredients
- Ingredients
1 Litre Full-Fat Milk
1/4 cup Rice (Basmati or short-grain), washed & soaked for 20 mins
1/2 cup Sugar (adjust to taste)
6–7 strands Saffron (Kesar)
1/2 tbsp Cardamom Powder (Elaichi)
1 tbsp Ghee (divided usage)
Mixed Dry Fruits (Almonds, Cashews, Pistachios) – chopped
Directions
- Prep the Rice: Wash the rice thoroughly and soak it in water for 20 minutes. Drain the water after soaking.
- Roast the Rice: Heat 1/2 tbsp ghee in a pan. Add the soaked, drained rice and roast lightly on low flame for about 1 minute. This adds a nutty flavor. Remove and keep aside.
- Roast Dry Fruits: In the same pan, add the remaining 1/2 tbsp ghee. Roast the chopped dry fruits until they turn golden and crunchy. Keep aside.
- Boil Milk: In a heavy-bottomed Kadhai (wok), pour the milk. Bring it to a first boil on medium heat.
- Simmer & Cook: Once the milk boils, lower the flame. Add the roasted rice and saffron strands. Cook on a low flame for 15–20 minutes.
- Stir: Stir occasionally to prevent the milk from burning at the bottom. Cook until the rice grains are completely soft and the milk has thickened to a creamy consistency.
- Sweeten: Now, add the sugar, roasted dry fruits, and cardamom powder.
- Final Touch: Mix well and cook for another 2–3 minutes to let the sugar dissolve completely. Switch off the flame.
- Serve: Serve hot or chill in the refrigerator for a cold dessert.
Recipe Video
Notes
- Refrigeration & Shelf Life: Always refrigerate your kheer once it has completely cooled to room temperature. Store it in an airtight glass container or covered bowl. Properly stored kheer will last 2–3 days in the refrigerator. After 3 days, discard any leftover kheer as the milk can start to spoil, and you may notice a sour smell or slightly off taste.
- Food Safety Tips: Always use clean, dry spoons every time you remove kheer from the container to prevent contamination. Never leave kheer at room temperature for more than 2 hours, especially during warm weather. If you notice any sour smell, unusual taste, or visible mould, discard immediately—do not taste or consume.
- Reheating Instructions: Kheer thickens as it cools and sits in the fridge. To serve, gently reheat on low flame or in the microwave in 30-second intervals, stirring well between each interval. Add a splash of warm milk (2–3 tablespoons) to adjust the consistency to your preference. Never use high heat as this can scorch the milk.
- Freezing (Optional): You can freeze kheer for up to 1 month in an airtight, freezer-safe container. Thaw overnight in the refrigerator before reheating. The texture may be slightly grainier after freezing, so use frozen kheer for recipes rather than serving as a standalone dessert.
- Serving Temperature: Kheer can be served hot during winters (straight after cooking), warm, or chilled. For chilled kheer, refrigerate for at least 4 hours or overnight. Some prefer it in traditional clay pots (matkas) which keep it cool naturally. Serve in small bowls with a spoon for dessert.
- Hygiene & Handling: Ensure all utensils used (pan, spoon, ladle) are clean and dry before cooking. Use high-quality, fresh milk from a trusted source. If making kheer during monsoon or humid season, store in airtight containers to prevent moisture and contamination.
Frequently Asked Questions
Can I use leftover cooked rice for this kheer?
Yes, you can use leftover plain cooked rice. Mash it lightly and add directly to boiling milk, then cook until the milk thickens. The texture will be slightly different from traditional kheer since the rice won’t bloom as perfectly, but it still tastes delicious and saves time.
Why did my kheer curdle or separate?
Kheer can curdle if jaggery or very acidic ingredients are added while the milk is boiling hot. Always add jaggery only after switching off the flame and allowing the kheer to cool slightly. Also, ensure your milk is fresh—old milk can cause separation. If this happens, pour the kheer through a fine strainer to separate the solids.
How thick should my kheer be?
Kheer should have a creamy, custard-like consistency—not as thick as pudding, but not as thin as milk either. It thickens further as it cools, so always cook it until it’s slightly thinner than your desired final consistency. If it becomes too thick after cooling, simply add a splash of hot milk and reheat gently.
Can I make kheer ahead of time?
Absolutely! Kheer actually tastes better the next day as the flavours deepen and develop. Make it a day in advance and store in an airtight container in the fridge. Before serving, add a splash of warm milk to adjust the consistency and reheat gently on low flame or in the microwave, stirring occasionally.
Can I use condensed milk as a shortcut?
Yes, for a quicker version: Use 1 litre full-fat milk + 1/2 cup sweetened condensed milk. Add the rice and cook for only 10–12 minutes instead of 15–20 minutes, as the condensed milk reduces cooking time. However, this method is less “traditional” and the flavour will be slightly different—more commercial and less authentic.
Can I make a vegan version of kheer?
Yes! Replace full-fat milk with thick coconut milk (1 litre) mixed with almond milk or cashew milk for richness. Use coconut oil instead of ghee for roasting the rice and nuts. Everything else remains the same. The kheer will have a lovely coconut flavour and works beautifully.
What’s the difference between kheer and payesh?
Kheer and payesh are essentially the same dish—rice pudding made with milk, rice, and spices. “Kheer” is the North Indian name, while “Payesh” is the Bengali name. The cooking method and ingredients are nearly identical. Some regional variations exist, but the core recipe is the same.Frequently Asked Questions


Leave a Reply